Even if you don’t teach online, it is easy to accrue a large number of emails from students asking for clarification of content, schedule, procedure, due dates, etc., many of which are repetitive. An easy way to reduce time spent emailing multiple students is to have an understanding with students that questions will be answered in a public discussion board posting or on the course announcement page. Let students know to check there first to see if their question has already been addressed. It is also a good idea to post class cancellations or changes to the course syllabus, policies, due dates, etc., to the announcements page of the course. Both you and the student will have a record to refer to if questions arise later.
A popular use of discussion forums in Bb is to set up a Q & A forum where students are encouraged to answer each other’s questions. The teacher then monitors the discussion and steps in if something needs clarification or if students are unable to answer the question. Having a forum like this in place can help you prepare for classes, as you will be aware of areas where students are having trouble.
Another use of discussion forums is to have students discuss topics that were brought up in class. This allows students to be active in their learning as they continue conversations and ask questions of each other.
Creating a Discussion Board
Step 1. Add a menu item from the drop-down list, located at the top left corner in the course.
Step 2. Select Tool Link
Step 3. Give the link a name and then select the tool type. In this case, you will need to choose Discussion Board 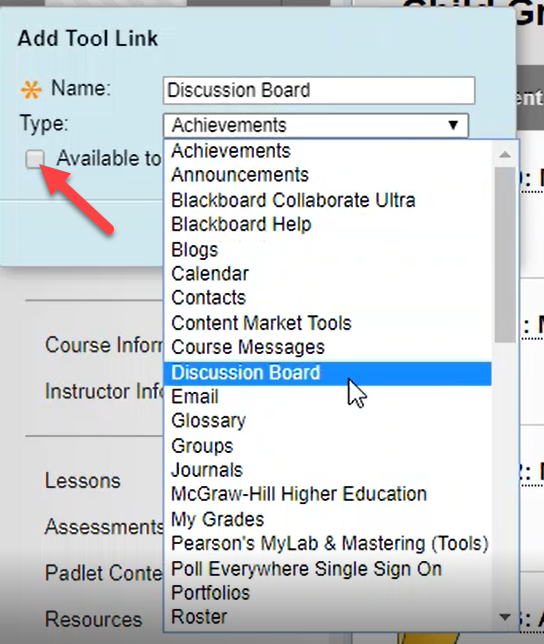
Step 4. Make the link available to the students.
Step 5. The discussion board link will now be visible in the course menu. Click on the discussion board link.
Step 6. In the discussion board content area click Create a forum.
Step 7. Type a name for the discussion forum.
Step 8. In the Forum Availablity section, select Yes. You can create forums ahead of time and set the availability to No until the discussion is ready to start.
Step 9. Select the Display After and Display Until checkboxes to enable the date and time selections. Display restrictions do not affect the forum availability, only when it appears.
Step 10. Select the Forum Settings based on your specific needs
Step 11. Click Submit
Additional Resources
“Discussion Board Guidelines” -Vanessa Dennen (Downloadable Asynchronous Discussion Guidelines is available on this site.)
“10 Tips for Effective Online Discussions“- Edwige Simon, EDUCAUSE Review