TechSmith Knowmia

What is TechSmith Knowmia?

TechSmith Knowmia is an educational video platform that allows you to create and share videos with your students. Video options include editing, closed captioning, quizzing, and conversations to provide more engagement opportunities for the students. Videos can then be shared in your Blackboard courses for easy access by the students.

For more information on the various features select one of the tabs below. (information adapted from TechSmith Knowmia Tutorials)

NOTE TechSmith Knowmia will no longer work efficiently on IE. It is recommended that you use the latest version of Chrome, Firefox, Microsoft Edge or Safari. System requirements can be found here.

Step 1. Got to MyLoyalist and log in with your username and password. 

myloyalist log in page with username and password

Step 2. Select Techsmith Knowmia


Your Techsmith Knowmia profile will automatically be connected to your Loyalist username. 

Step 3. You will now have access to your library. There you can manage and create folders, upload media, import from YouTube and create your own videos. 

Techsmith relay banner with Mylibrary, my groups and activity displayed

Step 4. Launch Capture will enable video options. See Launching TechSmith Knowmia tab for more details. 

Techsmith Relay menu options

Now that you have accessed TechSmith Knowmia and accessed your library you will to download TechSmith Capture so you can start creating videos. 

Step 1. Select Launch Capture. 

Launch capture option highlighted in red

Step 2. The first time you launch TechSmith Capture, the Launching TechSmith Capture webpage opens. Click the Download button to download the application.

Techsmith capture screen with the download button highlighted in red

Step 3.  After the download is complete, look in your web browser or system Downloads folder for the .exe file (Windows) or .dmg file (Mac). Here’s what it looks like in Google Chrome on Windows, for example:

Setup.exe folder with an arrow pointing to it

Step 4. After you’ve installed the app, return to the TechSmith Knowmia site and click Launch Capture again. The Launching TechSmith Capture webpage will open and you will have the option to Open TechSmith Knowmia Recorder. 

Open Techsmith Relay Recorder highlighted in red

Step 5. You can begin recording. See Recording a Video tab.

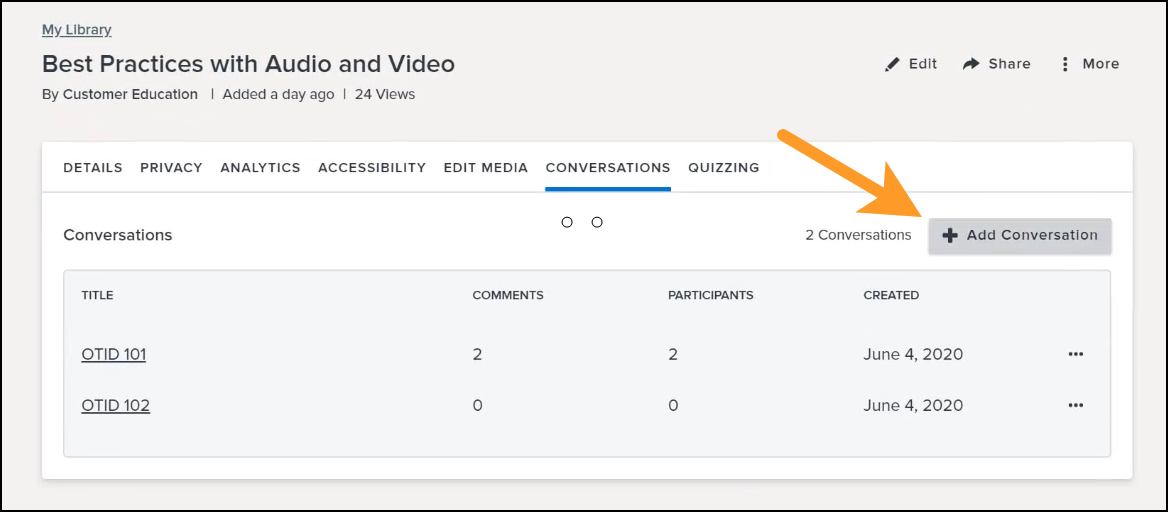
Recording Your Screen

TechSmith Capture records all screen action on a single monitor, or a region of the screen. This is great for recording slideshows, websites, or anything else you can show on a computer screen. 

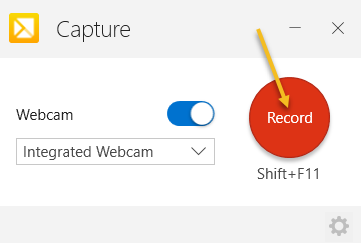
Step 1. After launching capture you will have the option to Enable the webcam. 

Webcam options highlighted on the Capture screen

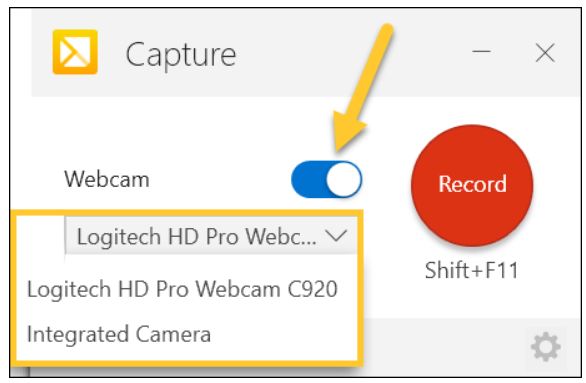
Step 2. Chose a webcam from our list of available devices. 

Note: If you don’t see your webcam in the list of available devices, make sure your webcam is on and connected to your computer.

Step 3. Click Record and you will then have the option to select a screen area.

a yellow arrow pointing to the record button

Step 4. Yellow crosshairs will appear. Click and drag to select the desired area of your screen. 

Computer screen with crosshairs selected on powerpoint screen

Setting up Audio

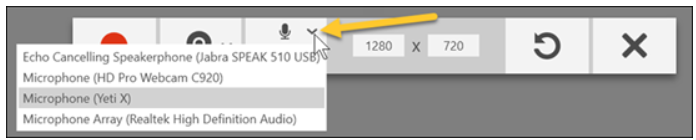
Step 5. Choose a microphone from your list of available devices.

Microphone options in the drop down menu

Step 6. If you need to toggle your microphone on or off during recording, click the microphone icon.

recording options with an arrow pointing to the microphone icon

System Audio – If you want to record audio that you hear playing back on your computer (youtube videos) you will need to enable the Record System Audio button. 

System audio highlighted on the recording options menu

Note: If you have the Webcam option enabled, your webcam displays in the capture area.

Webcam view

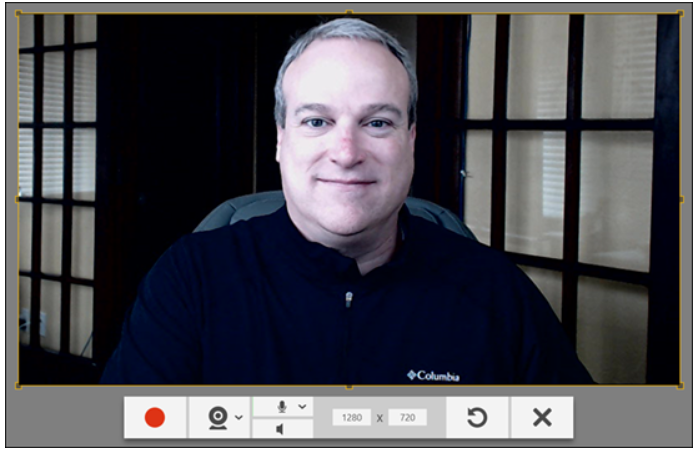
Step 7. Before or during recording, click the webcam icon to toggle the webcam on or off. Keep in mind that what you see on your screen is what will be recorded in your final video.
TechSmith Capture Webcam Icon
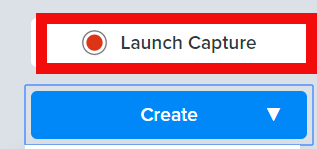
Step 8. When ready, click the Record button. 
TechSmith Capture Record Button

Note: If you need to re-select the screen area before recording, click the Start Over button.
Start Over Button

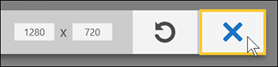
Note: If you need to cancel the screen area before recording, click the Cancel button.
Cancel Button

Pause and Stop Your Recording

To take a short break while making your video, use the Pause button to temporarily stop recording.
Pause button

When you’re ready to begin again, click the Record button to resume.
Resume Recording

When you’re all done recording, click the Stop button.
Stop Button

Notes:

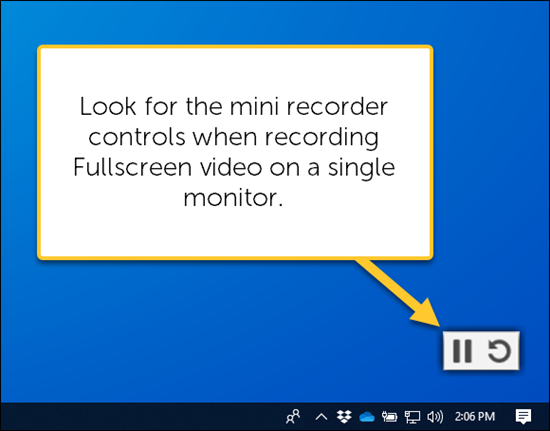
During recording, the recording controls may be displayed on a second monitor, if you have one.

If you record full-screen on a single monitor, look for the mini-controls in the lower-right corner of your screen to pause, resume, toggle your webcam, etc.
Mini controls when recording full screen

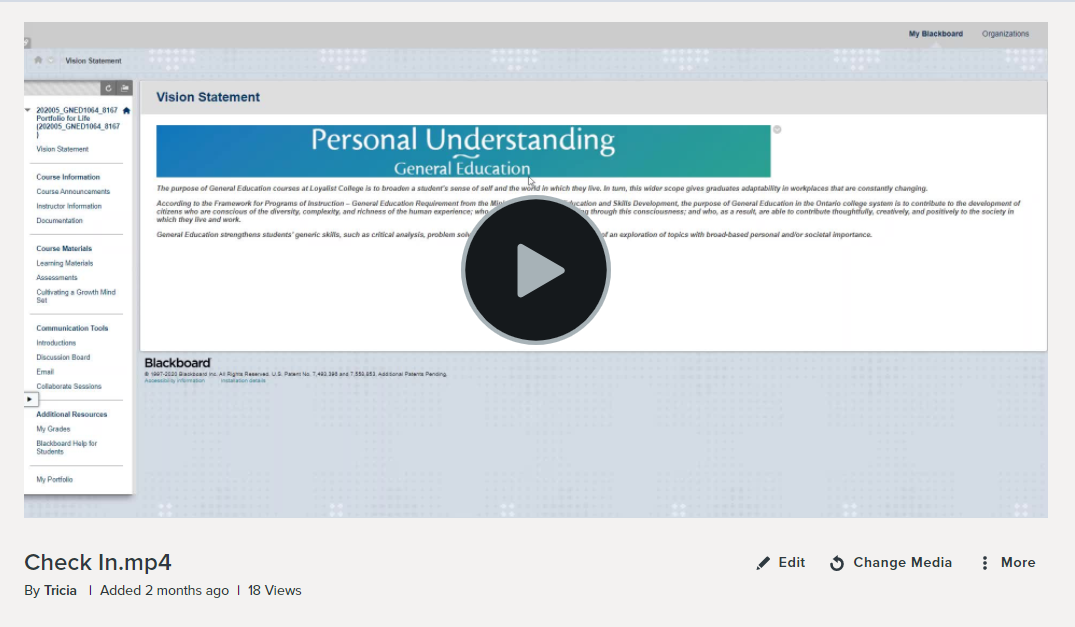
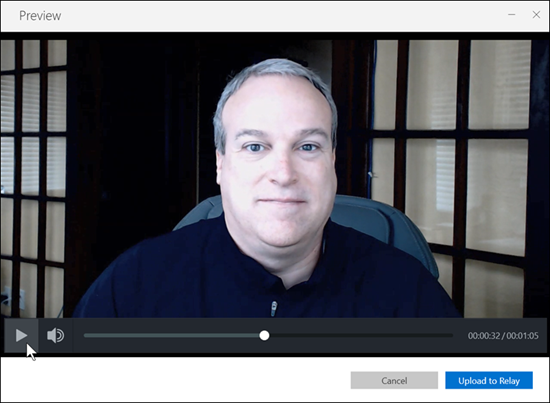
Preview Your Recording

After you finish recording your video, it opens in the Preview Window for you to play back. We recommend at least checking to make sure you’ve captured audio at a sufficient volume. From here, you can Upload your video to TechSmith Relay, or Cancel your recording if it didn’t turn out quite right.
Upload or Cancel

Additional Notes

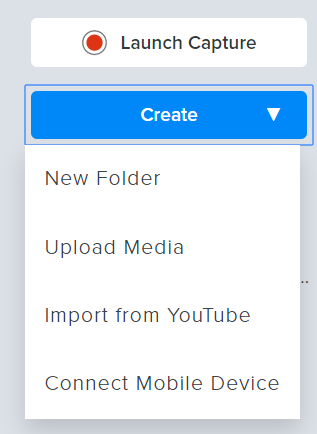
Locate the TechSmith Capture App

If you have multiple windows open on your desktop and are having trouble locating TechSmith Capture, check your taskbar (Windows) or dock (Mac) for a yellow TechSmith Capture icon. Clicking this icon should bring TechSmith Capture to the front of your open apps and windows.
Taskbar icon

Edit Mistakes From Your Video

Cut out mistakes and remove unwanted parts of your video using Knowmia’s online video editor.

Edit Media with Knowmia

Knowmia has a video editor to help remove mistakes in your videos. To get started click Edit Media below the video on the watch page.


Two Options to Edit

To edit a video and preserve captions, quizzes, comments, and audio description tracks, choose Edit a Copy > Copy and Edit. Note: this will create a new link to this video.

To edit a video and preserve the original video link choose Edit this Video > Edit. Note: this removes captions, quizzes, comments, and audio description tracks for the video.

Remove a Section of Video

Click the Play button to watch your video and locate sections to remove. Use the Playhead to jump to a section to edit. When you find a section to remove, drag the red or green handle to make a selection or use the Set buttons.

Click Cut to remove the selection, and a marker will be visible where the cut was made. 

Undo a Mistake while Editing

To undo the last edit you made, click the Undo button. To undo all edits and start over, click the Restore Original Video button.

NOTE: Restoring the original video will not restore captions, quizzes, or video analytics.

Save Your Edits

To leave the Video Editor and keep the changes you made, click Save & Exit. When all edits are complete, click Publish. The watch page is updated with the new video.

Watch the following video for a demonstration. 


Video Editor FAQ

Why don’t I see the Edit Video option?

The Edit Video option only appears under videos you’ve added or copied to your own media library. Videos linked from YouTube cannot be edited, and in order to edit someone else’s video, he or she would have to give you ownership of that video.

Will I need to re-share my video after I edit it and publish a new version?

If you edit the original video, the URL will remain the same and any LMS links will remain intact. If you edit and publish a copy instead, that copy will have it’s own unique URL, so you may need to re-share the new link and/or update any links in your LMS. 

Should I edit a copy or the original video?

If your goal is to remove mistakes or misinformation from your video, and you don’t mind losing quizzes, captions, or analytics, edit the original so that you don’t have an outdated video in your library. If you want to make an alternative version of a video that has less information, make a copy and edit that instead.

What’s the difference between ‘Save’ and ‘Publish’? 

Saving your changes stores unpublished edits with the file, but does not publish a new version of the video. If you re-enter the video editor, you should see your existing edits. To commit your changes for others to see, you will need to publish the video.

Can I undo changes I’ve already published?

You can always access the video editor on any video you own and restore the original video; however, the undo stack is cleared every time you publish. So, if you’ve published a video several times, you cannot revert to just any previous state. You can work with the current version to remove previous edits, or restore the original and recreate any necessary edits.

TechSmith Knowmia makes it simple to generate speech-to-text captions for your videos based on the existing audio track. And the built-in Caption Editor makes it possible for you to edit and publish generated captions when you’re ready.

To generate captions for an existing video:

Open Accessibility Options

From the video Watch page, click the Accessibility tab below the video. Note: The Accessibility tab is not available for videos added via YouTube.

Generate Speak to Text Captions 

Click Add Caption Track, select Speech-to-Text, and click Apply.

Accessibility Options

The Accessibility section keeps track of the status, and an email is sent when the captions are ready for review.

Publish Captions

When the status says Ready for Edit, click the option menu and either Publish the captions directly to your video without reviewing them, or choose Edit to open the Knowmia Caption Editor.

The following video from TechSmith Knowmia demonstrates how to edit the captions after they have been generated. 

At times, you may find you need to edit your Collaborate session recordings, or other videos you have made and would like to post in Blackboard. 
Some file extensions do not work to upload directly into Blackboard. Uploading them to Knowmia will allow you to make edits, add closed captioning, or create a shareable/streamable version of your video to then either imbed to your course in Blackboard or share a link directly to your video.

Below you will find instructions for uploading a video or recording to Knowmia: 

Step 1: Open Knowmia and select “Create” to navigate to Upload Media.

Step 2: Select Upload Media

Step 3: A new box in the middle of the screen will appear you to select files to upload. Locate the file you wish to upload.

Step 4: Once your file uploads, you will find it in your Knowmia Library. Navigate through the other steps listed on this page to either edit, save, publish and then share back in Blackboard. 

There are a few options for sharing videos from TechSmith Knowmia. 

The following is the recommended option for sharing to Blackboard. 

Step1. Select video from TechSmith Knowmia library. 

Step 2. Scroll down to the Share option 


Step 3. Select Embed and make changes to the size of the video if preferred before copying. 

Step 4. Open course in Blackboard 

Step 5. Select the preferred content area in the course menu. 

Step 5. Build content and then choose item.

Create Item highlighted in the build content menu

Step 6. Select the HTML icon in the content editor.

Step 7. Paste the embed code into the Source code area and select Save. 


Step 8. At this point, you will see the video thumbnail. You can add any text instructions or information about the video. If you need to resize the video you will need to start again at Step 3.


Step 9. Submit. 

Video thumbnail

Note: Students will be able to view the video in full screen or in the thumbnail view. 

Step 1 – Go to a content area

Step 2 – Select Tools

Step 3 – Select TechSmith Knowmia

Step 4 – Name the video link that you want to share. Then enable evaluation if you want to grade.  Add grading details and submit

Step 5 – Click on the newly created link

Step 6 – You will be directed to your library through the launch LTI link

Step 7 – Add media, you will have to option to preview before exiting. Remember to add the conversation if needed. 

Step 8 There is no submit button. You can return to the course to review by selecting the home button at the top left of the screen or by going to My Blackboard and opening the course again. 

Folders and Groups FAQ

Do folders have privacy settings?

No. Your folders (including folder names) will be viewable by other TechSmith Knowmia users visiting your library. However, each individual piece of media inside the folder will still respect the media privacy setting, regardless of whether it is in a folder or not. 

Can I share a link to a folder?

Yes, but with a caveat. To share a link directly to a folder, use the “Get Link” option from the folder actions:

Folder thumbnail with cog menu expanded and Get Link hover

However, please note that the media inside the folder will need to be set to the “Anyone from your organization” or “Anyone with the link” if you’d like it to be visible to someone viewing the folder contents. Having a link to the folder is not the same as having a link to the media itself.

Can I create a folder in a group?

Not at this time. Currently, folders are for personal media organizations only.

Do I have to manually add members to my groups?

Only if the group privacy is set to “By invite only”. If you’d like to make it easier for TechSmith Knowmia users to join your group, consider using the “Open to your organization” or “Only those with the link” group privacy settings:

Screenshot of group privacy settings with the first two options highlighted

  • Open to your organization – Anyone who finds this group can openly join it.
  • Only those with the link – Users will need a link to find and join this group. To get the link, use the “Add a Member” option from the group Members tab, and the link will be at the top:
    Add members to group modal window with Link to group highlighted


To add a quiz:

  1. Click the Quizzing tab below the video on the watch page.
  2. Click Add a Quiz to open the quiz editor.
    Add a quiz button in Knowmia

Create Questions

Play the video, or scrub through and pause where you want to add a question. Click Add New Question.

There are four question types available:

  • Multiple Choice
  • True/False
  • Fill in the Blank
  • Free Response.

To add additional questions, click the Add New Question button.
Select type of question

Grade Questions

For a question to be graded, click to add a checkmark next to the correct response.

Note: If no correct answer is specified, the question behaves like a survey and will not be calculated into the quiz score.
Check box next to question answer

Provide Feedback

Provide text feedback based on whether the answer was correct or incorrect.

  • Fill out the text fields in the Feedback dialog box.
  • Choose a feedback action from the dropdown menus.
    Feedback dialogue boxes based on answers

Publishing and Previewing the Quiz

While editing quizzes, the drafts are auto-saved every few seconds.

When finished:

  1. Click the Save Quiz button to finalize and publish the quiz. 
  2. Exit the quiz editor. 
  3. Playback the video and preview the quiz to make sure it behaves as expected.

Reviewing quiz results

As soon as someone takes the quiz, revisit the Quizzing tab and click, View Results.

The main page shows a summary report, and gives you options to:

  • Download quiz results in a spreadsheet format. 
  • Filter and view your report by Viewer.
  • Filter and view your report by Question.
    Summary page for quiz results

Add a Quiz to a Video

Video quizzes are attached to specific points on the timeline. Add as many quizzes as you want throughout your video.

Overview

The Conversations feature allows content creators to collaborate, review, and discuss a video with others. Conversations align written comments and drawn annotations with specific points in the video, making reviews quick and easy.

The key benefits of using conversations:​

  • Enhance student engagement with course content.
  • Improve student-to-student interactions.
  • Increase an instructor’s social presence.
  • Streamline the content review process.

Add a Conversation to a Video

Learn how to use in-video commenting to connect with students, and also connect them with each other.

Add a Conversation to a Video

To add a conversation:

  1. Click the Conversations tab below the video on the watch page.
  2. Click Add Conversation
  3. Enter a Title.
    Add conversation button on watch page

Share a Conversation

To share a Conversation with others:

  1. Click Options menu >  Get Link
  2. Copy the link and share it via email or post it in your course website.
    Get link option to share conversation

Open a Conversation

To open a Conversation:

  1. Click the title. 
  2. Viewers can watch the video, post questions and comments, and answer each other’s questions. 
  3. Use the annotation tools to point to a specific area in the video.

Note: If a participant is not signed into their TechSmith account, they are prompted to either sign in, or self-identify themselves. This is required to add a comment, or reply to someone else’s comment in the video.
Click title to open the conversation

Post Notifications

Turn on Receive Notifications to get an email if someone replies to your post. 
Click the View Now button in the email to go directly to the conversation in the video.
Receive notifications toggle to turn on

Edit or Delete Posts

As the content owner, remove other people’s posts by going to Edit and then Delete.  
Note: Individual participants can only edit and delete their own posts.
Trash button next to comment to delete

Conversations Options

  • To go back to the video on your Knowmia Watch page, click Manage Media
  • Navigate to the Conversations Tab to see updated analytics about the Conversation.
  • Click the Options menu to download a spreadsheet of the comments.
  • Choose Clear Comments to remove all comments from this Conversation, or Delete to remove the Conversation permanently.
    Options menu for the conversation

Multiple Conversations

To add multiple Conversations to the same video:

  1. From the Conversations Tab, click Add Conversation.
  2. Enter a new Title. 
  3. Share and manage this Conversation with new participants, since it has its own unique URL.

Note: The URLs for Conversations are different from the URL to  share the video.
Add conversation button to add multiple conversations

Add a Conversation to a Video

Learn how to use in-video commenting to connect with students, and also connect them with each other.

When using TechSmith Knowmia videos in your courses, you have the option to review the analytics. 

When you select a specific video you will see the analytics option below. 

Once there you will be able to filter through users and length of time the video was viewed.